CPINFO20 Web Development
🌩 Module 3: Backend - Express server with templates
1 Express hello world
mkdir weather
cd weather

npm init

npm install --save express
👉 Press enter for all of the npm questions.
Create the file app.js:
const express = require('express');
const app = express();
const port = 3000;

app.get('/', (req, res) => res.send('Hello CPINFO!'));

app.listen(port, () => console.log(`Example app listening on port ${port}!`));
💡 Tip: Enable VSCode “auto-save” feature to save your files automatically.
Test your server with node .\app.js and navigate to http://localhost:3000.
You can kill your app by pressing ctrl+c in the console.
Bonus
Add nodemon to make it easier to debug your web server.
npm install --save-dev nodemon
💡 The --save-dev switch makes nodemon a “development” dependency: a dependency that is not required to use your application, but is required to develop it.
Add the following to your package.json:
"scripts": {
  "dev": "nodemon app.js"
}
⚠️ Be sure to keep the correct commas in your package.json.
Now run your server with:
npm run dev
Try modifying the message returned in your server, save the file, and notice the server automatically restarts.
2 Server side templates with pug
Follow the steps to integrate a templating engine into your express server:
npm install --save pug
Add to your app.js:
app.set('views', './views');
app.set('view engine', 'pug');

app.get('/hello', (req, res) => {
  res.render('hello-page', {title: 'Hey', message: 'Hello there!'});
});
Create a pug template file in views/hello-page.pug:
html
  head
    title= title
  body
    h1= message
⚠️ Be sure to read some of the documentation about the pug templating language.
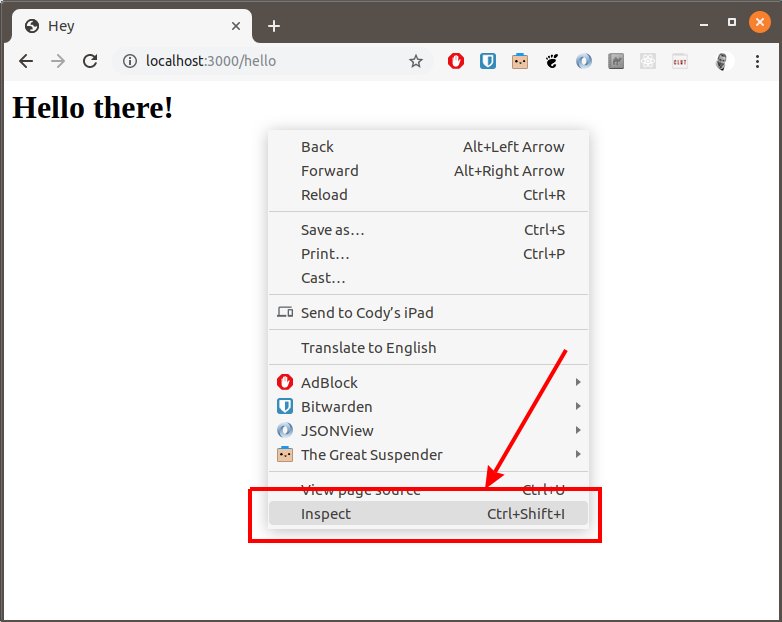
Test your new index page by navigating to http://localhost:3000/hello. Open the chrome dev tools and look at the rendered HTML. Notice that the message and title and passed as variables.
Open the chrome dev tools and look at the source file.
Question 2.1: What did the line h1= message in index.pug render to in HTML?
3 Static Files
Follow the steps to add static files into your web server.
Add the following configuration into your app.js:
app.use(express.static('public'));
Add some image files from the internet (3 or 4) into the directory public/images of your project.
Test your static files by navigating to http://localhost:3000/images/abc.jpg
Exercise 3.1: Add a new pug view in views/originals.pug that renders an html document that dynamically includes each image in an img tag and is served at http://localhost:3000/originals.
Hints:
- pug can iterate over an array of values by using the
eachkeyword. - Using the same mechanism that allowed us to pass the
messageandtitlevariables to the template, we can pass an array of image paths. - You will have to load the image paths using the
fsmodule:const fs = require('fs'); // ... const imageFiles = fs.readdirSync('./public/images'); console.log('image files:', imageFiles); - The goal is to render an
<img src="images/..." />tag for each image in your images directory. Refer to the pug documentation for how to set attributes with pug.
4 URL Parameters
We can create URL parameters by using the :varname syntax when adding routes to the app.
Inside our route handler, we can then access the value of the variable inside req.params. So if our route URL is /hello/:name and we navigate to /hello/cody in our browser then req.params.name is automatically set to 'cody'.
Exercise 4.1 Create a new pug view at views/weather.pug that is served with with the url /weather/:city and displays a message ‘Weather for {CITY_NAME}’ where CITY_NAME is the value of the parameter passed in the URL.
5 Calling APIs
Install node-fetch into your project:
npm install --save node-fetch
node-fetch will let us call other APIs.
Add node-fetch to the require statements at the top of app.js:
const express = require('express');
const fetch = require('node-fetch');

// ...
Calling an API is “asynchronous”, meaning the request happens in the background and our code will be notified when it is complete. node-fetch will let us make API requests using promises or async/await (this has the advantage of letting us use try/catch syntax for error handling).
To use async/await with express, we will have to make our handler async, allowing us to await for asynchronous functions.
To call the api https://jsonplaceholder.typicode.com/albums?userId=2 with node-fetch we can do the following:
app.get('/testasync', async (req, res) => {
  try {
    const params = new URLSearchParams({userId: 2});
    const result = await fetch(`https://jsonplaceholder.typicode.com/albums?${params}`);
    const albums = await result.json();

    console.log('STATUS CODE:', result.status, 'DATA:', albums);
    res.send(`There are ${albums.length} albums in the result.`);
  } catch (error) {
    console.error('An error occurred:', error.stack);
    res.status(500).send('Error!');
  }
});
Exercise 5.1 Update your /weather/:city route to display the 7 day weather forecast for any city.
Hints:
- A basic algorithm looks like this:
- fetch the geographical latitude and longitude from the here API
- parse the longitude and latitude from the response
- fetch the weather for the longitude and latitude with the OpenWeather API
- lodash is javascript library with helpful utilities. The lodsah
getfunction will be helpful to parse the latitude/longitude and the daily forecast from the API responses:- Install it
npm install --save lodash - Require it
const _ = require('lodash'); - Use it
_.get(/* ... */);
- Install it
- Remember that pug can iterate over an array of values by using the
eachkeyword (i.e. you should iterate over the 7 forecast days) - The timestamps inside the OpenWeather weather response are in Linux epoch seconds time. JavaScript works with milliseconds. We can parse and format a seconds timestamp like this:
const time = 1572562800;
const timeString = new Date(forecast.time * 1000).toLocaleString();
Note the same can be done inside a pug template:
html
  body
    p The time is #{new Date(time * 1000).toLocaleString()}
💡Alternatively, you can use moment.js to parse and format date and times.
- 🚀 BONUS: Consider adding some fancy icons like feather icons. Here is an example pug template with an icon:
html head script(src='https://cdn.jsdelivr.net/npm/feather-icons/dist/feather.min.js') body p i(data-feather='cloud-lightning') | | Today it is raining! script feather.replace({width: '1em', height: '1em'}) - 🚀 BONUS: Consider add some style with CSS:
- You can do “inline” styling in pug if you are a CSS guru.
- Alternatively, consider adding bootstrap (or another CSS library) to do something fancy!
Bonus: Debugger 🚫🐛
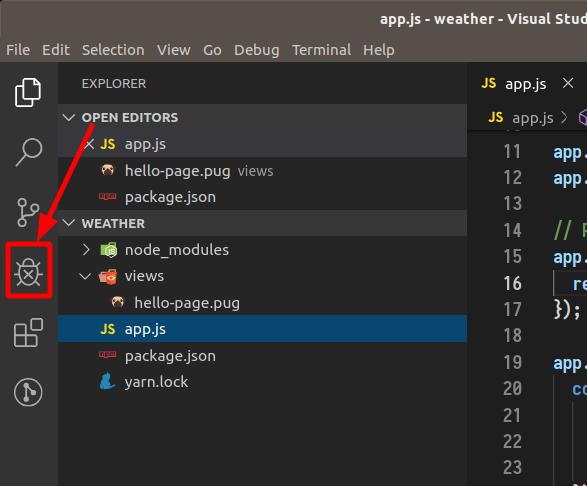
In Visual Studio Code:
-
Open the debugger panel:
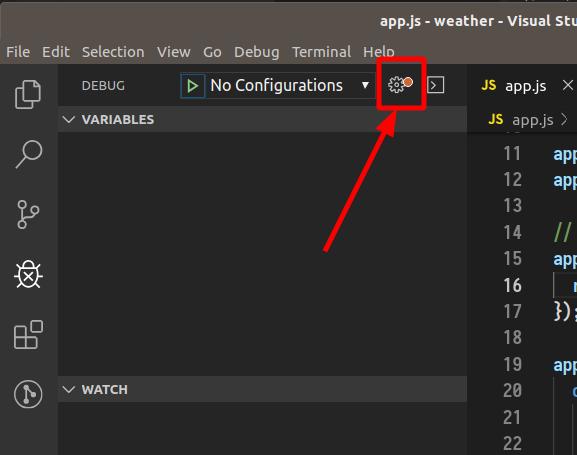
-
Open the launch config:
-
Configure the debugger to open our
app.jsfile: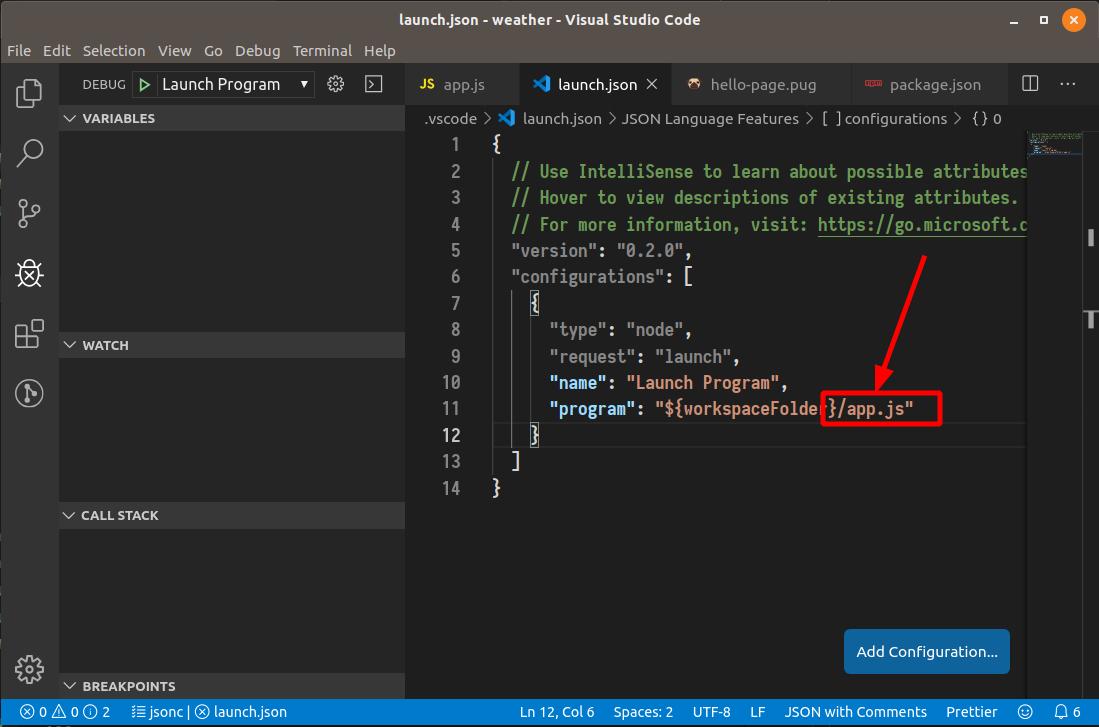
-
Set a breakpoint in the code and start the debugger:
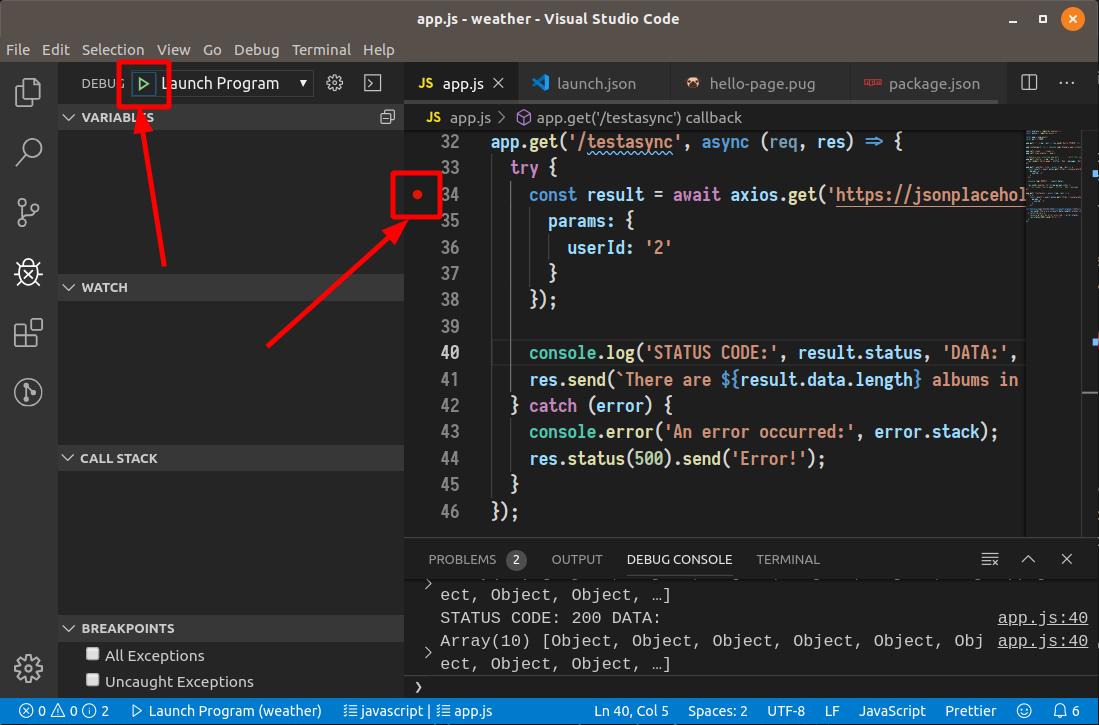
- Refresh the browser and see the application break at the breakpoint. You can inspect the local variables, update values, and step through the code.
- ⚠️ If you application is running in the console, be sure to kill it before starting the debugger.